Thursday, January 5, 2012

The Bell Mark III

So I thought this might be a cunning way to see who actually READS my blog, instead of just clicking 'like' on Facebook to keep me under the illusion that I have friends...

Meet the latest addition! ETA is July 26th, which sadly in reality will mean sometime mid August, going on past form.


It has been an enormous surprise for us all and in fact a rather unpleasant first trimester in terms of morning sickness and sub-zero energy levels. I spent a fair proportion of my previous pregnancies singing to the porcelain choir also, but this round has been something else again. So if you have found me somewhat aloof and green about the gills over the last few months, the reason is now clear. Also apologies to Room 3 for some rather hasty retreats from the classroom and for spending much of Term 4 sitting at my desk with my head in my hands - your basic facts results really weren't THAT bad.

So anyway, this event has sadly necessitated the hasty replacement of our trusty old Toyota Camry, AKA 'The Dog Poo' that has served us well for many, many years. We had the choice of buying 3 carseats that would fit in the back, at a cost of $1500 (and renewing the Cam Belt - again!) or buying a new vehicle that will serve us for the next 10 years. We settled for a Toyota Ipsum, and by some minor miracles and a fair bit of generosity, we managed to get one that is actually quite flash! The kids are forbidden to sully it or leave so much as a raisin behind when they get out. Long may it last!

Despite this splash-out, it is my intention to buy this baby very little. We simply don't NEED any more stuff, though some of the stuff I recently gave away may be requested back at some point - sorry all! At the end of the day, some clothes is all it really needs, though aren't these really cute?

Tuesday, December 27, 2011

How to brew Elderflower Champagne

Ooh, so nervous about guest-blogging on my wife’s blog. She’s far funnier and eloquenter (see!?) than me. Thanks Middy for letting me have a go!

When one becomes confident enough in one’s own brewing legendarity to decide to guest-blog about how ‘quick and easy’ a simple springtime champagne is… yup - you guessed - it all almost goes belly-up.

But don’t let that daunt you - this delicious Elderflower Champagne really IS easy to make, now that I’ve made the mistakes for you…

And the end result - enough summery booze to float a small ship at a tidy 7% ABV, or thereabouts…


Before starting, you’ll need a few things. I’ll divide this into two lists - Equipment, and Ingredients. Actually, no, I’ll waffle a little, and divide this by places you buy stuff from.

EQUIPMENT

1 bucket to ferment in. Assuming you don’t have a fermenting barrel, Payless Plastics sell 20l food-grade pails with lids.

An airlock for your bucket, and a holey-bung to hold your airlock. Here you’ll need a trip to the home brew store - perfect if you really want to ensure you feel like an old piss-head, booze-hag, or master-craft-brewer, depending on your gender and zen on the day.

While you’re there…

INGREDIENTS

Pick up a decent champagne yeast and some wine nutrient (not having this was my own big mistake).

Plastic Bucket with Lid ~ $15
Airlock ~ $6
Sparkly yeast sachet ~ $6.50
Wine nutrient ~ $6ish

Then, off to the Supermarket for

3kg white sugar
White wine vinegar
6 lemons


METHOD

Step one - pick elderflowers from the side of the road. I never realised how abundant and everywhere they were until we did this.


You need about 35 decent heads of Elderflower.

Dissolve sugar in boiled water. Pour into fermenter/bucket. Zest and juice lemons and add to barrel. Add 2 Tbsp of white wine vinegar. Check Elderflower for any brown manky bits. Remove mank. Add to syrup. Fill barrel two thirds with cool water. Stir like a mad thing to aerate. Fill barrel to 19-ish litres.


^^ DO NOT use this yeast, pictured. More on this in a mo.

TEMPERATURE

You’re aiming for not-cold, but not warm. 20-28 deg should be fine. Assuming you started with a few litres of boiling water, just add the rest as cool tap-water.

YEAST

The official story is that Elderflower should have enough wild yeast on it to start the fermentation. Obviously the yeast-fairy didn’t shake her thang over our bush of choice though. And don’t even think about using the generically specified ‘Brewer’s yeast’ in other recipes. My fermentation didn’t kick for more than a week, and this made me very nervous, as this lag-time is where things get whiffy and forked.

Basically just follow the steps on the yeast sachet - a half tsp of sugar in 50ml of warm water, add yeast AND yeast nutrient. Wait half an hour. Stir, and add to your barrel. Don’t stir the barrel. At least, that’s my advice. Let the yeast you added start fishing at its feet, and spread out from there. Other more advanced brewers may tell me this is bullocks.

Fit your barrel lid and airlock. First time, this involves drilling a tight hole for your rubber bung. Put some *boiled* water in your airlock, to about half-way up the chambers. The purpose of the airlock is to stop your brew getting infected by letting the CO2 out, but no air in.

The CO2 is the yeast eating the sugar and converting it to alcohol.

After 24 hours or so, the lid of your barrel should be tight and puffed up a bit, and hopefully your airlock should be bubbling away, anywhere from a blurp every few seconds to just a few times a minute.

Assuming your fermentation kicks good, it should be done in a week. Leave it two, till the lid goes slack, and the airlock water-levels go even (I’m trying not to mention ‘Hydrometer’, as I don’t want to over-complicate this for you).

BOTTLING

Using sterilized (fresh from dishwasher) equipment, add 1 level Tbsp of sugar to each 1.5 litre bottle. Scoop elderflower from the top of your brew with a sieve (sterilized!). Line a funnel with muslin. Scoop out a pitcher-full of your soon-to-be champers, and pour it into bottles. Leave a bit of space at the top.


As you get to the bottom of the barrel, try not to disturb the yeast-cake that has formed on the bottom too much. You’ll see it clouding as you do. It’s a bit tricky to scoop the last little bit out. You’ll probably waste a wee bit.

Cap bottles tightly. Invert and shake a bit to get the sugar mixed up. Place somewhere even-temperatured-ish (spare room wardrobe here).

Watch those suckers like hawks to make sure they don’t chain-reaction explode all over your wife’s lovely new carpet.

When bottles are fully tight, chill and enjoy. You’ve got about 3 months - 5 and she’s getting pretty tart and dry.

One 1.5l equals about 9 standard drinks, which seems like a fair challenge.

Any probs, flick me a message at facebook.com/stevebells.

Saturday, November 19, 2011

Coconut smashing and things

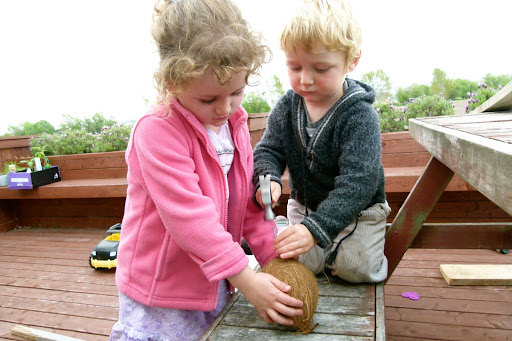
The kids always used to implore me to let them shake a coconut when we go to the supermarket. It must have been something I did with them one trip when I was trying to avoid grizzles, but anyway it became a tradition. They also always begged to buy one and I always said no. That became kind of a tradition too. One day recently I actually thought before saying the obligatory 'no' and threw one in the trolley. The kids were elated!

We got home and did some talking about what might be inside and how we'd get it out. Google helped us a little.

The children then got busy with a hammer and a nail and broke a few holes for the liquid to drip out. That took a while, but Soph was determined to sit it out! When we were bored of that, we wrapped it in a towel and bashed the living daylights out of it with a hammer, until it cracked in half. All and all, the kids were entirely unimpressed and haven't even done so much as acknowledge a coconut since. Lots of fun all the same. And it only cost $3.90 ;-)


We are now well into November and despite being a funny old season of wind, rain and very little heat, things are finally coming together in the way of produce around here. I've had a bit of a rough run with the vege patch, what with rogue chooks, birds and cats scratching where they are unwelcome, and 3 year old children taking it upon themselves to independently plant the entire bag of seed potatoes in (and I quote) "All of those places", but I think we'll get there. My biggest issue is actually having run out of room, and my poor husband not having time to whack me up more raised beds! If we lived anywhere else in our area, then that wouldn't be an issue and I'd just get the shovel out and stop whingeing. Soil around here is pretty rocky and frankly average though, so we need to buy it in until the compost gets cracking. And it's always convenient to blame someone else, isn't it?

Here are some pics of what is going on:
Beans and peas


One of our more prolific apple trees. Really must thin the fruit down, but it pains me!


Widdle wee bubba nashi pears!


Cherries. The tree appears to be straining a bit and we need to net it if we don't intend to supply the birds with a feast sometime soon.


Mandarin blossom! And leaf curl, but lets ignore that. Citrus is hard work in our spot, as although we get fabulous heat we also get dreadful frosts. Am hoping to get fruit from both our mandarins and limes next year though!

Saturday, October 29, 2011

The Unscary Scarecrow


My school have a fabulous display of scarecrows displayed at the moment and today we finally succumbed to the requests (demands) to make one of our own. This was partly due to the somewhat alarming collection of perfectly wearable clothing piling up in the 'Clothes For Scarecrow to Wear' pile outside, most of which had been pilfered from wardrobes other than Sophie's own!

It was a bit harder than I had initially imagined to make. We ended up using a pair of straw-stuffed holey tights as arms and running a stake through them for stability. A rubbish bag of straw served as the body, and a plastic supermarket bag the head. Sophie thoughtfully illustrated the scarecrow's frock with pictures of lambs, hay sheds, butterflies and stars and gave it smiling face. Of course all art work must be named. This rule applies to scarecrow faces too.


Caleb is a bit nervy of scarecrows, due to a story we once read about one with a grumpy face. He seems a little unsure of this one, but was happy to attack it with a drill and hammer, so it can't be too frightening!


Oh, and just to make you die laughing (as my dear husband did while taking the photo) this is evidently how I look swinging a hammer. There is a good reason I am usually given the measuring tape!

Tuesday, October 18, 2011

Owls

Sophie has been begging me to do some paper craft with her lately, and after a friend's baby shower where we made owl bunting, I was inspired to do some owl stuff. Despite Soph's vehement distaste of the birds already hanging above her window, she also quite liked the idea.

We used templates to cut scrapbooking paper of varying prints into the correct shapes, then simply glued them on canvas. Some vintage buttons added to the appeal, and sparked lots of lovely discussion about how to make something look in different directions and how our eyes work together as a team. Caleb had a fabulous time playing in the buttons and trying (mostly unsuccessfully) to find matching pairs - it reminded me of the many hours I spent as a preschooler delightedly playing in Mum's button tin full of treasures. What a fabulous and underrated learning tool they are - sorting, describing, matching etc - all really valuable pre-maths skills.


I can't decide which I like best. Possibly the top one, despite its wonky beak, glue marks and uneven tree branch. Kinda adds to the appeal.

Saturday, October 15, 2011

Fire

A month or so back, I posted this picture, of my parents' 150 year old homestead in the freak snowstorm we had:


The other night, we saw it like this:


We are devastated. My family have lived in that home for 100 years, and it contained countless Irreplaceable family heirlooms, as well as all of the simple, essential things needed to run a large sheep farm - vehicle keys, gumboots. lambing records. My sisters lost their clothes, shoes, laptops, university notes. I live over the road, so it wasn't really my everyday *stuff* that was lost. But little things like special childhood toys, books, Christmas decorations - all of those things that create and cement memories are gone. I was at a baby shower today, and teared up when I realised we've lost our baby record books. You never miss them, until they're gone.

The house was beautiful. She'd been a bit rough when Mum and Dad first moved in 11 years ago, but they had almost finished the renovation, with just 2 bedrooms, the laundry and the exterior painting left to finish. On a house of that magnitude, an incredible amount of work had been completed, mostly by Dad and relatives. This wasn't a renovation done on a shoestring, either, unlike the one Steve and I completed on our old house. We'd done a good job (if I do say so myself ;-) ) but for us, money was a big constraining factor, and to begin with, our house (though a similar age) didn't have the... grandeur, I guess, that Bankhead did. In it's day, it was a show home, and it was very close to being that again.

But through it all, the wonder of humankind comes through. Wonderful, wonderful folk who gave meals, baking, time out of their own busy lives to sit and cry with us, look after our children or sift through ashes to try and find our treasures.

Thank you.

Tuesday, October 4, 2011

Spring!

While I'm at home (not quite as wretchedly ill as I have been over the past four days) and childless, thanks to the wonder of preschool, I thought I'd update some of our happenings lately.

I alternate between thinking that 4 year old girls are the devil incarnate and the most fabulous creatures around. I don't tend to hover in between these extremes. Currently my feelings are on the favorable end of the scale. Sophie is learning huge amounts every day - not necessarily the schooly-type stuff, but the really important, 'this is how the world works' kind of stuff.

The other day, whilst I was busy being wretchedly ill and Steve was on solo Dad duty, Sophie decided she'd like to make a kite. She tied a piece of string to a picture she'd created a few days earlier and took it outside. Of course it failed and she stomped inside in a fit a fury. At this point, an interesting situation developed involving the differences between the female and male mind. Or maybe jut the mind of a teacher and the mind of fixer.

Steve (who admittedly at this point had already suffered several days of essentially parenting two busy preschoolers alone and was somewhat frazzled) said "Of course it won't work. I'll make you a kite later. But not now." Male mind: Solve problem.

Enter ill and woebegone mother / teacher / embracer of learning experiences at the expense of sanity...
"Why didn't it work, Sophie?"
Sophie: "It was all floppy"
"How could we fix that?"
And here was her solution - straws and a tail.


And you can guess what happened. It still didn't work and we had a repeat of the earlier drama. Poor Steve was getting a tad frustrated at the excessive emotion, as afterall, he had offered to fix the problem. What were we messing around with?

Sophie and I had a discussion about what else we could change that would make it work. Her eyes lit up and and she said "THE SHAPE! It has to be a diamond shape!" We were on the way, and through the process of trial and error, she'd come to some important conclusions about the laws of physics and the limits of craft supplies.

At this point, Steve intervened. As a fixer and a perfectionist, he simply couldn't suffer through the process any more, and sat down with the kids and researched some kite making. They ended up sacrificing an old cot sheet, a bamboo stake and a string line and it worked! Unfortunately, we have no pictures of The Great Kite Flying, but apparently it was so impressive that cars slowed on the highway to watch two little poppets flying their piece of homemade wonder, picking dandelions as they went!

The tail, incidentally was made with fan-folded origami paper. It seems by teaching Sophie this trick, I may have sparked a new obsession. Heaven help us all.

Here are some pictures of the process and the finished product, yet to be painted.


All in all, it was a fascinating probe into not only physics, but the differences in thinking between two people essentially working to meet the same goal. One that seeks solely to create a product that works with the minimum of fuss, and one that seeks to learn along the way and maybe not actually end up with anything but a heap of failed experiments and a list of things that didn't work. And a fair guess at why that may have been. Neither is wrong, but spot which one is the teacher ;-)


Another thing we've been doing is planting the seeds for this year's summer vegetables. As an experiment, we did the old 'bean in a jar with paper towels' trick. Though we used loo paper, as we had no paper towels. I intended to take a pic every day, but failed miserably! In any case, the seed germinated OVERNIGHT! I can definitely recommend a heavily used coffee machine as a good spot for speedy seed growing. Gotta be some bonus benefits to our excessive caffeine consumption!

It has been a fascinating thing to watch. Great for explaining the role of roots, stems and leaves, which mean nothing to your average preschooler. Also great for them to be able to see what is going on under the soil in the pots sitting on our windowsill. So far, it has helped repel nosey fingers from investigating... mostly **twitches a little**

Day One:


Day Four:


Day six: